Backend Setup
Setting up the backend comes with following steps.
1. Setting up JAVA 21 in you computer.
You should have,
- JDK installed.
- Environment variables setup (required only for Windows and Ubuntu, since most of the cases this setup is already available in MacOS installation).
If you already have above two configured then you are good to go with the next steps, but if you don't have them yet, then you can download and install java jdk from the Official Oracle Downloads and you can configure the environment variables referring Oracle Docs.
This is just about having the basic java setup in your computer, so if it is difficult, you can follow more other tutorials in the internet.
2. Cloning the repo and setting up the environment file.
2.1 Clone the repo.
Skapp community is a monolithic repo where it contains both backend and frontend codebases in the same repository. You can clone the code from community repo - https://github.com/SkappHQ/skapp.
It has two main folders - frontend and backend. You can either use the same IDE or two different IDEs to run the backend and frontend separately following the next steps.
2.2 Open the project in your favorite IDE.
Usually our backend developers use IntelliJ IDEA so it is what we are going to use in this tutorial as well.
2.3 Link environment file.
The env file is located in root level of the backend folder, and it is named as .env.local .
If you are coming from a java background you already know how to link the env file using the IntelliJ Edit Configurations setting. If so, you can do it by your own, and then you can directly jump into the next step Frontend Setup. But if this is something new for you, then you can follow the detailed instructions below to set it up.
2.2.1 Step by step guide to link env file in IntelliJ
Open Current File menu and then click Edit Configuration.
This is located towards the top right corner of your IDE as below.

It will open the following dialog.
Then open the Add New Configuration Panel using one of the markers.
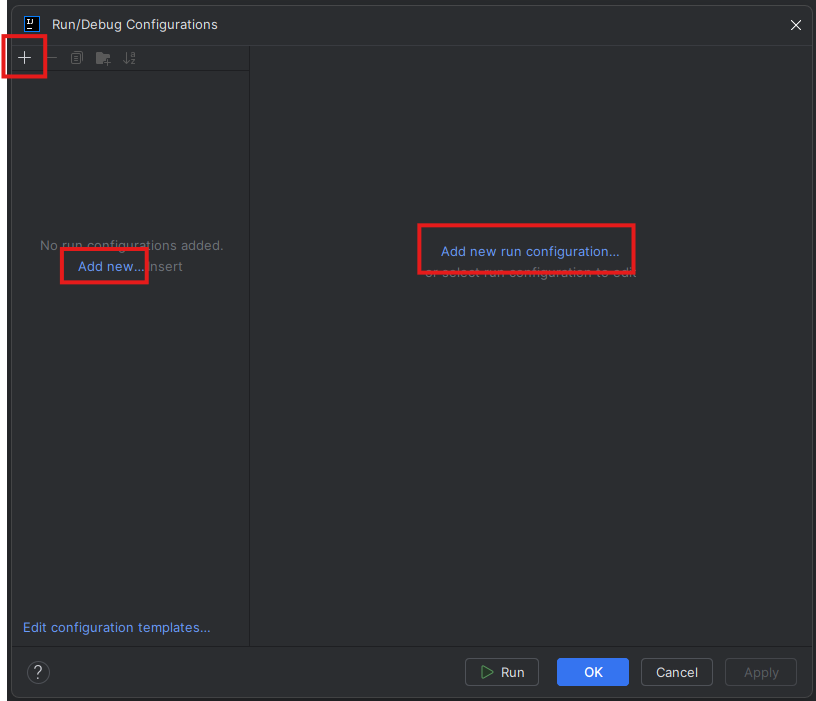
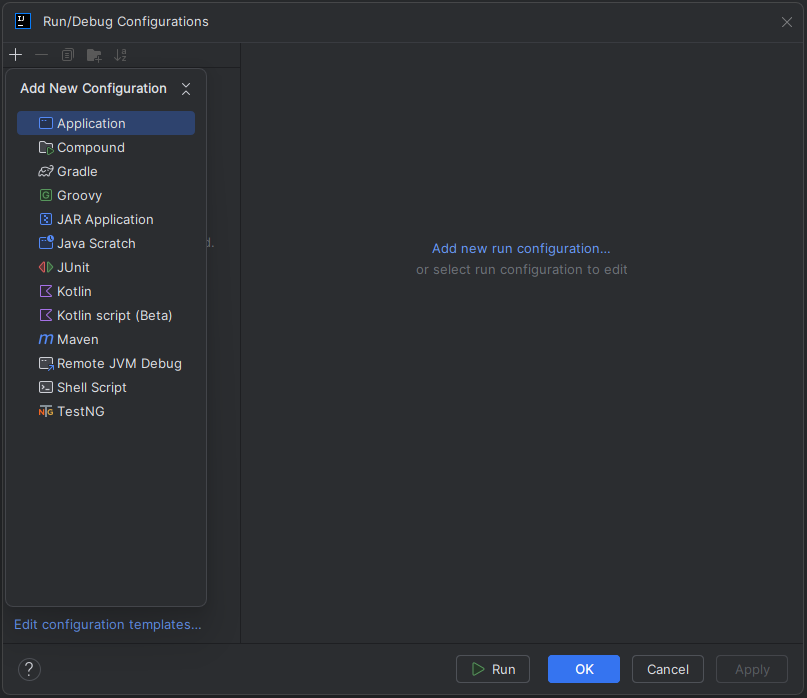
It will open the menu list as below.
Select Application menu from the list.
This will open the below dialog, and initially it is with empty fields but below you can find how to set each required field.
1 - Name: You can enter the configuration name (here we can put skapp-be).
2 - Java runtime: Here you can set the path for the java folder (search more on how to find the path if you are having difficulties in that step).
3 - Main class: Here you can set the main class file.
4 - Environment variables: Here you can set the path of our environment file located in the project root folder.
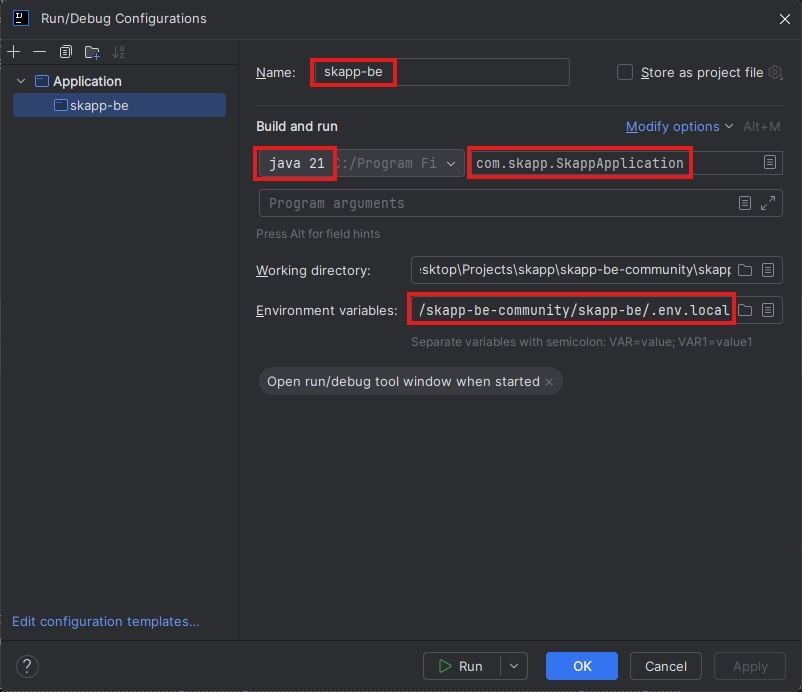
Finally save the configurations using the OK button.
3. Updating the env file with desired values.
Your initial .env.local file should looks like follows.
DB_URL=jdbc:mysql://localhost:3306/skapp-dev?createDatabaseIfNotExist=true
DB_USERNAME=<your-db-user-name>
DB_PASSWORD=<your-db-password>
SPRING_PROFILES_ACTIVE=non-prd
FILE_ENCRYPT_KEY=<random-string>
SIGN_IN_KEY=<random-base64-string>
ENCRYPT_DECRYPT_SECRET=<random-string>
But there are few values we have to set under your setup. So let's go through them one by one.
- DB_URL
Most probably your local MySQL server is running on port 3306. So you can keep the value as it is. Note that skapp-dev would be the name of database which is getting created when you run the backend service. - DB_USERNAME and DB_PASSWORD
These are the database credentials you need to provide in order to connect the backend with the database. You should have remembered the username and password of your MySQL server, if not you can find some ways to reset it before continuing from here. Before proceeding, make sure your MySQL server is running and the username/password works using some other clients like MySQL Workbench. - SPRING_PROFILES_ACTIVE
This is the springboot profile we are using in the local development mode so you can keep it as it is for now. - FILE_ENCRYPT_KEY
Skapp application has some features where users can upload files, and for the security reasons those files are getting encrypted before storing in the desired location, and this key is used as the encryption key for the encrypt decrypt algorithms. You can just put a random value for this. - SIGN_IN_KEY
This is the key used to create the JWT tokens(for authentication and authorizations) and this key should be in base64 format. There are simple ways of creating a random base64 string, and you can quickly generate a one using this link as well(https://www.convertsimple.com/random-base64-generator/). - ENCRYPT_DECRYPT_SECRET
This key is used in places where we need generic encryption and decryption. Just a random string would be ok for it.
3. Running the backend service.
Final step is running the backend service once you are done with everything as explained above.
Note - We are using port 8008 to run the backend by default, so if you have any processes running under this port, please stop them or if you need to run in a different port you have to do some configuration changes before proceeding.
As Follows you can find the run button towards the top right corder of the IDE.

Once you run the service successfully, you will get the following as the final console log which means that the application is running as expected.
[main] [] [] INFO [com.skapp.SkappApplication] - Started SkappApplication
Additionally, if you want to open the Swagger UI, you can open the below url in any browser
http://localhost:8008/swagger-ui/index.htmlIf you are getting any difficulties in running the service, then there might be a problem in any of the steps above, so try to go through all the steps again.
If you are still stuck, then reach out to our community channels to get help from our community members.
Once you are done with the backend setup, then you can move to the next step - Frontend Setup.